Are you looking to save money while achieving professional results with your home pool painting project? With a few simple steps and some basic supplies, it’s possible to paint your pool like an expert.
Whether youre looking for a complete overhaul or simply want to freshen up the existing colors and design of your pool, DIY pool painting can be both cost-effective and rewarding.
In this article, we will discuss the best techniques and materials for transforming your swimming pool into something truly unique.
Gather Necessary Supplies for Pool Painting
Painting a pool can be an intimidating and expensive task. However, with the right supplies, it doesn’t have to be! Gather all the necessary items for painting your pool including paint, brushes, rollers, tarps or drop cloths, and painter’s tape.
It is important to use quality materials that are meant for outdoor projects like this one to ensure long-lasting results. Make sure you have enough paint on hand so that you don’t run out mid-project – nothing will ruin the finish of your work faster than having to switch paint colors halfway through! Additionally, consider purchasing additional tarps or drop cloths as these are great for protecting both your equipment and surrounding surfaces from any accidental splashes or spills during the project.
Lastly, don’t forget gloves and protective eyewear; safety should always come first when it comes to DIY home improvement jobs like this one. With quality supplies at hand and proper safety precautions taken care of beforehand, you’ll be set up for success in achieving professional results while saving money on a job well done!
Selecting Paint Appropriate for a Swimming Pool Environment
Painting your pool is an inexpensive and relatively easy way to give it a fresh, new look. But before you start painting, it’s important to make sure that the paint youre using can withstand the harsh environment of a swimming pool.
Choosing a water-based acrylic or epoxy pool paint is key for achieving professional results in your DIY project. This type of paint will resist fading from UV rays and chemicals used to keep the water clean, while also providing a durable surface that won’t easily chip or flake off.
Additionally, opt for low VOC (Volatile Organic Compound) paints when possible; these are safer for both people and pets who may be exposed to them on or near the pool deck. Taking all this into account helps ensure your hard work pays off with beautiful results that last long after you’ve completed your project!
Applying Primer and Paints to Achieve Professional Results
Painting your pool can be an economical and rewarding experience. It’s important to choose the right primer and paint to achieve professional results without spending a fortune.
Applying primer and paints correctly will help ensure that the job is completed properly, with long-lasting results. Before beginning any painting project, it’s essential to select suitable products for the job at hand.
Using a good-quality pool primer before applying the paint ensures that colors remain vibrant after drying and prevents peeling or fading over time. Choose a high-performance paint that is designed specifically for pools; this type of product offers superior coverage and longevity compared to standard house paints or other generic varieties.
When prepping the area before painting, be sure to thoroughly clean all surfaces with soap and water before proceeding; dirt, grime, mildew, algae, or other debris must be removed completely for proper adhesion of primer and paints. Once prepped, use an appropriate roller cover based on surface texture – medium nap rollers work best on most pool surfaces – then apply two coats of primer evenly across all areas being painted while taking care not to overlap strokes too much as this could cause streaking issues during drying time which are difficult if not impossible to repair afterward.
Allow ample dry time between each coat of both primer and paint; usually, one full day should suffice but always consult manufacturer instructions for optimal recommendations regarding specific products you plan on using beforehand so there are no surprises later down the line when finishing up your project! Apply two coats of finish color following the same procedure used when applying primers – waiting a full day between each layer – until desired look has been achieved then allow the final coat plenty of time (usually 48 hours) before allowing anyone into the swimming area again as chemicals from newly applied paint may still leach out into surrounding waters during initial curing period after completion so extra caution must be taken here once everything is said done!
Finishing Touches to Perfect Your DIY Pool Painting Job

When it comes to finishing a DIY pool painting job, the devil truly is in the details. Taking that extra time and effort can mean the difference between an average result and one that looks professionally done.
Here are some tips for perfecting your painting job:
1. Take care with prep work: Preparing your pool surface correctly is essential before beginning any paint job. Make sure all surfaces are clean, dry, smooth, and free of debris or blemishes before applying primer or paint.
2. Invest in quality materials: Quality paints and primers will give you better results than cheaper options, so consider investing in higher-end products to ensure a professional finish.
3. Use multiple layers of paint: For best results when painting over old surfaces, use at least two coats of paint with appropriate drying times between each layer to ensure the longevity and durability of your finished product.
4. Pay attention to edges & corners: Don’t neglect those small areas around steps and other features; these require just as much attention as the main parts of your pool walls if you want professional-looking results! Add additional protection where needed by using edging tools such as masking tape along corners or against fixtures like handrails for a perfect finish every time!
5. Dont forget top coat sealer!: Using an appropriate sealer will provide added protection from UV damage and help keep your painted surface looking good for years to come – dont skip this important step!
Conclusion

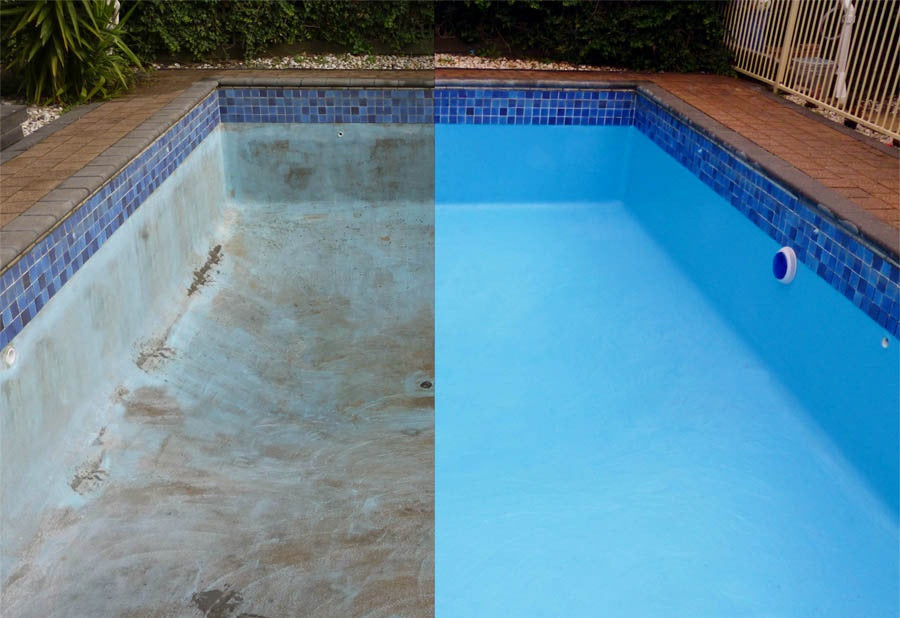
Painting a concrete pool is an excellent way to save money while achieving professional results. With the right preparation and materials, DIYers can easily paint their pools with minimal time and effort.
When done correctly, painting concrete pools can provide a longer-lasting finish than other types of pool surfaces, allowing homeowners to enjoy their newly painted pool for many years to come.